|
Marcita
|
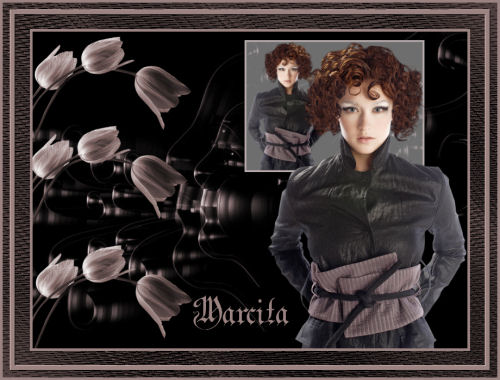
Marcita
...........
L & K Elvida
Supplies here 1 tubes and a background: Here
Place the materials in the folders where they belong
Take the arrow to remember where you have remained
1 - Open a new image Width 800, Height 600, select all
2 - Open psp.FBE.tmp_background duplicate and save one for a while
3 - Edit – Copy – paste in to selection
Select none , layer opacity 57
4- Open pspFBC.tmp (lady) duplicate and save one for a while
5 - Image resize Height 600, width will adjust
6 - Edit – Copy – paste as new layer
7 - Move her to the right
8 - Layers-Merge – merge all layers (flatten)
9 - Image - add borders 5 pixels#9a8381
10 - Image resize Height 250, width will adjust - Mirror
Put it a side
11 - Open a new image Width 800 Height 600 select all
12 - Take the same background and paste in to selection
13 - Maximize your image
14 - Edit – copy – paste as new layer
15 - Move it to the upper right see example
16 - Open the lady tube again height 600
17 - Edit – copy – paste as new layer
18 - Move her to the right, see example
19 - Open 2706_47-Flower (tulips)
20 – Adjust – Hue and saturation- colorize
21 - H on 4 and S on 30
22 - Image –resize Height 250 , width will adjust
23 - Edit – copy – paste as new layer
24 - Move it to the upperleft , see example
25 - Duplicate and move it a bit down
26 - Duplicate again and move a bit down see example
27 - Layers-Merge – merge all layers (flatten)
28 - We start with the borders 5 pixels color #9a8381
50 pixels#000000 and 5 pixels#9a8381
29 - Select large border with your magic wand
30 - Effects L & K Elvida colorize as in point21
31 - Select none- select all
32 - Selection modify - contract 18
33 -Layers – new Raster layer
34 - Floodfill with#9a8381
35 - Selection modify - contract 10
36 - Press delete
37 - Select none
38 - Select new border
39 - Effects – 3D effects- Outer bevel, Standard, color white
40 - Layers-Merge – merge all layers (flatten)
41 - Select your text tool and write with a nice font your name on it
42 - Add your Water mark
43 - Layers-Merge – merge all layers (flatten)
44 - Image – resize – I made mine Height 600, width will adjust
45 Sage as .jpg – compression 20
And this lesson is done
Have fun, love Hanny
Translator Rita