|
Summer
All other materials available Here
Plug-ins here Photo Effex Scanline 2 Tube’s , a background and 1 font
|
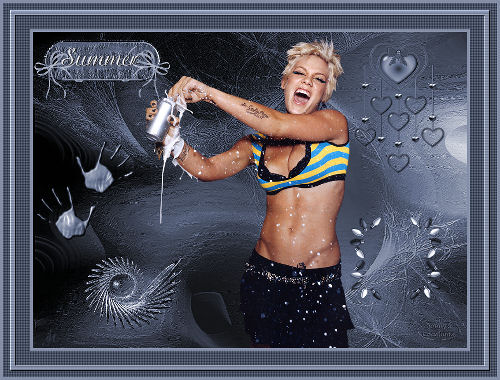
Summer
All other materials available Here
Plug-ins here Photo Effex Scanline
2 Tube’s , a background and 1 font
Save them into the file of your choice
Open in psp
Take along this arrow to where remember you have remained

Put the materials in the folder they belong
1 - Open a new image Width 800, Height 600,
2 - select all
3 - Open JHanna 32 bground
4 - Edit-Copy-Paste in selection
5 - Select none
6 - Adjust- Hue and Saturation – Colorize H 158 - SV 43
7 - Open pink3 woman
8 - Image-resize Height 600 Width will adjust
9 - Edit- Copy and paste as new layer, place her in the middle, see example
10 - Open Biu Sharon bleu name plates ( without name )
Colorize as in point 6
11 - Edit- Copy and paste as new layer , place it in the upper left corner
12 - Open Apurplebleu Colorize as in point 6
13 - Image-resize
14 - Image-resize Height 100 Width will adjust
1 - Edit- Copy and paste as new layer
16 -Place it left on your nametag, see example
17 - Layers- duplicate- image mirror, place it to the right on your nametag
18 - Open bleu hands Colorize as in point 6
19 - Edit- Copy and paste as new layer
20 - Place it nicely under the nametag
21 - Open swirlin Edit- Copy and paste as new layer place it a bit to the right of the hands
22 - Open bleu hanging hearts, Colorize as in point 6
23 - Image-resize Height 250 Width will adjust
24 - Edit- Copy and paste as new layer
25 - Place it in the upper right corner
26 - Open Bleu White Bulb Beads
27 - Colorize as in point 6
28 - Image-resize Height 150 Width will adjust
- Place it in the lower right corner , see example
31 - Layers – merge- merge all layers (flatten )
32 - Write with a nice font, size 48 Summer on the nametag
33 - Give it a dropshadow
34 -Add watermark and initials
35 - Layers – merge- merge all layers (flatten )
36 - Add borders 5 pixels #848ea6
Add borders 50 pixels#464e62 and 5 pixels#848ea6
37 -Select the large border with your magic wand
38 - Effects Photo Effex Scanlines – image rotate to the right
39 - Image rotate to the left
40 - Select none
41 - Select all
42 - Selection modify – contract 18
43 - Layers - new raster layer
44 - Flood fill with #848ea6
45 - Selection modify - contract 10
46 - Press delete button
47 - Select none
48 - Select the new border with your magic wand
49 - Effects Photo Effex Scanlines
50 - Effects – 3D effects – outer bevel default, select none
51 - Layers – merge- merge all layers (flatten)
52 - Image-resize Height 600 Width will adjust
53 - Save as jpg compression 20
The lesson is done, have fun , love Hanny
Translator Rita