|
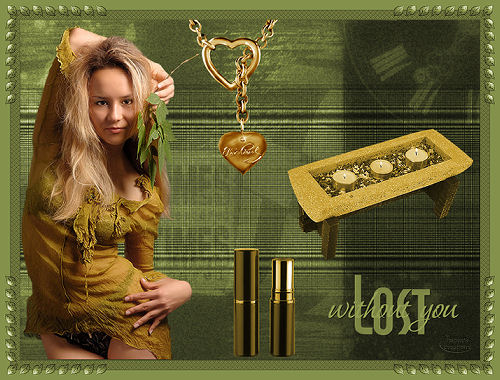
Lost without you
All other materials available: Here
|
Lost without you
All other materials available: Here
Filters:
FM.TileTools Blend Embos
Materials : 5 tubes a texture and a wordart
Save them into the file of your choice
Open in psp
Take along this arrow to where remember you have remained

1 - Open a new image 800 x 600 Select All
2 - Open texture 12 bonnie
3 - Edit / copy Edit / paste into selection. Select None.
4 - Adjust / Hue and Saturation / Colorize Hue 48 Saturation 83
5- Open mc2934.pspimage Image resize height to 600 pixels the width adjusts itself.
6 - Edit / Copy Edit / Paste as a new layer.
7 - Place her to the left. (see example tag),
8 - Open 2143 jewel Image resize height to 300 pixels the width adjusts itself. All layers checked.
9- Effects / Adjust / Variations check Midtones and Show Clipping and fine and coarse should be in the middle and then click on darker twice.
10 - Edit / Copy Edit / Paste as a new layer. Place at the top middle of your image.
11 - Open candles Image resize height to 250 pixels the width adjusts itself. All layers checked.
12 - Edit / Copy Edit / Paste as a new layer. Place mid/right of your tag (see example).
13 - Open make up 61 Edit / Copy Edit / Paste as a new layer. Place mid/bottom of your tag (see example).
14 - Open in love bbl 07 02 wordart File / Export / Custom Brush fill in the name by author put your name. Check Save Variance Step on 32
15 - Click your airbrush and find the brush you just made. Layer / New Rasterlayer16 - Set your color to # 919b50 and click once on the bottom right under size – 350. Image resize 80 % all layers unchecked. Repeat the 80 % resize.
17 - Effects / Drop Shadow V1 H1 Opacity 100 Blur 1.00 Color #191010
Merge all layers
18 - Image / Add Borders 1 pixel #191010
19 - Image / Add Borders 15 pixels #919b50
20 - Image / Add Borders 1 pixels met #191010
21 - Select the 15 pixel border with your magic wand.
Image / Rotate right
22 - Effects / Texture Effects / Weave Gap size 2 Width 2 Opacity 38 Weave Color # 191010 Gap Color #919b50 Fill gaps unchecked.
23 - Image / Rotate left Select None
24 - Image / Add Borders 15pixels #919b50
26 - Open ccg corner29 Edit / Copy Edit / Paste as a new layer
27 - Place in the top left corner (see example tag).
28 - Effects / Simple / Top Left Mirror and they are placed in all four corners
29 - Merge all layers
30 - Place your watermark or initials on your tag.
31 - Image / Resize height to 500 pixels the width adjusts itself.
32 - File / Sdave As .jpg
33 - Compression on 20
Your lesson is done.
Enjoy!
Hanny