|
Jet
All other materials available Here
Filters - Filters Unlimited
|
Jet
All other materials available Here
Filters :HereFilters - Filters Unlimited
Materials : 8 tubes 1 photo and 1 pattern
Save them into the file of your choice
Open in psp
Take along this arrow to where remember you have remained

1 - Open a new transparent image 800 x 600.
2 - Selections / Select All
3 -Open 4243g.jpg Edit / Copy
Edit / Paste into selection
Selections / Select None
4 - Effects / Plugins / Filters Unlimited 2.0 / Paper Textures /
Canvas Fine / Intensity - 156 Lightness - 87
5 - Open Flower Arrangement 2 by Lux Edit / Copy
Edit / Paste as new layer
6 - Image / Resize 80 % make sure the all layers box is NOT checked.
Then move the flowers to the left side of the table.
7 - Open glamour Edit / Copy
Edit / Paste as new layer
8 - Place in the middle of the table
9 - Open Jet woman Edit / Copy
10 - Edit / Paste as new layer
11 - Image / Resize 98 % make sure the all layers box is NOT checked.
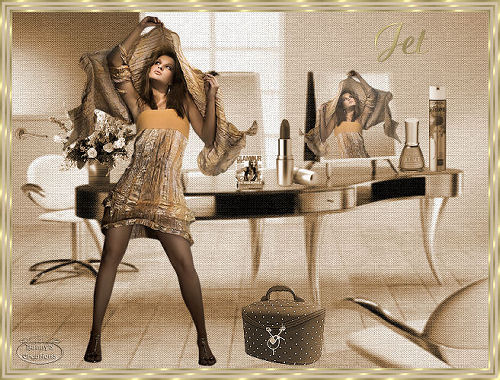
Then move to the left of your image. Look at my example tag.
12 - Open tasger3 Edit / Copy
Edit / Paste as new layer
13 - Place the bag on the floor in the middle of your image. Look at my example tag.
14 - Open jet woman again and with your selection tool set at a rectangle, select the top part of the tube. Edit / Copy
Edit / Paste as new layer
15 - Image / mirror
16 - Image / Resize 80% make sure the all layers box is NOT checked.
Do this two more times. (totalling 3 times). Move to the right mirror. Look at my example tag. Set the opacity to 79.
17 - Open haarlak1ger Edit / Copy
Edit / Paste as new layer
Move to the right of the table. Look at my example tag.
18 - Open nagellakger6 Edit / Copy
Edit / Paste as new layer
19 - pImage / Resize 80% make sure the all layers box is NOT checked.
Do this one more time. (totalling 2 times). Move to the right of the hairspray. Look at my example tag.
20 - Open lippenstift2ger Edit / Copy
Edit / Paste as new layer
21 - Image / Resize 80% make sure the all layers box is NOT checked. Do this one more time. (totalling 2 times). Move to the middle of the table. Look at my example tag.
22 - Opende gerdadeurknop Image / Mirror
Edit / Copy
Edit / Paste as new layer
Move to the left above trhe chair. Look at my example tag
23 - When everything is in place to your liking, Layers/ Merge / Merge Visible
24 - Image / Add Borders 1 pixel symmetric Color: #e5dob9
24 b - Image / Add Borders 3 pixel symmetric Color: #ffffff
25 - Select the white border with your magic wand tool
Then fill with the goldfold pattern.
Selections / Select None
26 - Image / Add Borders 5 pixel symmetric Color: #e5dob9
27 - Image / Add Borders 3 pixel symmetric Color: #ffffff
28 - Select the white border with your magic wand tool
Then fill with the goldfold pattern.
Selections / Select None
29 - Image / Add Borders 5 pixel symmetric Color: #e5dob9
30 - Image / Add Borders 3 pixel symmetric Color: #ffffff
31 - Select the white border with your magic wand tool
Then fill with the goldfold pattern.
Selections / Select None
Select the font tool and choose a nice font for your writing.
I used Arioso size 72. Set your background to your pattern goldfold and close off your foreground color.
Edit / Drop Shadow
H1 V 1 Opacity: 100 Blur: 1,00 Color: #9c7f5e
Don’t forget your watermark
Layers / Merge / Merge Visible
I resized my tag to 500 pixels high the width is adjusted automatically.
32 - Save As .jpg
I hope you had fun with this tutorial.
Love, Hanny
This tutorial was tested by Elly Veleke