|
Port city
All other materials available Here
Filters – Pentacom VTR2
|
Port city
All other materials available Here
Filters:Filters – Pentacom VTR2
Materials :
tube and 1 image – wallpaper
Save them into the file of your choice
Open in psp
Take along this arrow to where remember you have remained

1 - Open a new image 800 x 600 Select All
1 - Open a new transparent image 800 x 600.
2 - Selections / Select All
3 - Open wallpaper 3d-1067.jpg Edit / Copy
Edit / Paste into selection
Selections / Select None
4 - mImage / greyscale
5 - Image / increase color depth / RGB 16 bit channel
6 - Set the layer opacity to 75
7 - Open tube Azyzam-woman 8-October
Resize the tube to a height of 600 – the width adjusts automatically
8- Edit / Copy
Edit / Paste as new layer
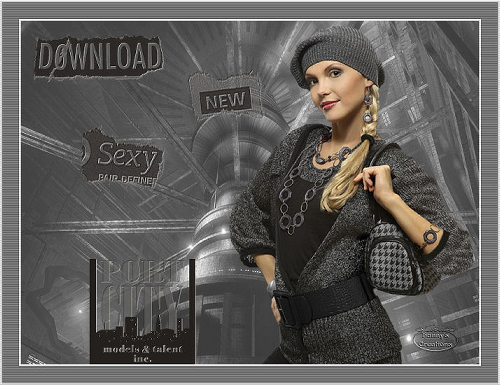
9 - Move her to the right. Look at my example tag.
10 - Open the .jpg Download, New, Sexy and Port City
For each go to file / Export / Custom Brush
A Create Brush Tip window will appear. Type the name of the file in the fist box and click OK.
Then go back to your tag image and add a new layer.
10 - Set your foreground to black. Select your paintbrush tool and in the drop-down window find the port city brush. Click at the bottom left. Look at my example tag.
11 - Effects / drop shadow / h 1 v 1 opacity: 100 blur: 1,00 color: #9f9f9f
12 - Layers / New Layer
13 - In the drop-down window find the Download brush. Using the same color, click at the upper left corner. Look at my example tag.
14 - Effects / drop shadow / h 1 v 1 opacity: 100 blur: 1,00 color: #9f9f9f
15 - Layers / New Layer
16 - In the drop-down window find the New brush. Using the same color, click left of the woman’s shoulder. Look at my example tag.
Effects / drop shadow / h 1 v 1 opacity: 100 blur: 1,00 color: #9f9f9f
17 - Layers / New Layer
18 - In the drop-down window find the Sexy brush. Using the same color, click to the left under new. Look at my example tag.
19 - Effects / drop shadow / h 1 v 1 opacity: 100 blur: 1,00 color: #9f9f9f
20 - Layers / Merge / Merge Visible
21 - Image / Add Borders 3 pixel symmetric Color: #dadada
22 - With the magic wand select the border
23 - Effects / Pentacom / VTR2 - Selections / Select None
25 - Image / Add Borders 30 pixel symmetric Color: #e3e3e3
26 - With the magic wand select the border
27 - Effects / Texture Effects / Blinds
Width: 2 Opacity: 38 Horizonal and Light from left / top
28 - Selections / Select None
29 - Image / Add Borders 3 pixel symmetric Color: #dadada
30 -With the magic wand select the border
31 - Effects / Pentacom / VTR2
Don’t forget your watermark
Layers / Merge / Merge Visible
Save As .jpg
I hope you had fun with this tutorial.
Love, Hanny
Afbeelding formaat wijzigen 550 hoogte of 500 breedte past zich aan
Bestand opslaan als jpg compressiewaarden 20
Ik hoop dat jullie het weer met plezier maken
Liefs Hanny