|
Fhasion
Filters :Here
Greg´s factory output 2 Unlimited 2.0
All other materials available Here
|
Fhasion
Filters :Here
Greg´s factory output 2 Unlimited 2.0
All other materials available Here
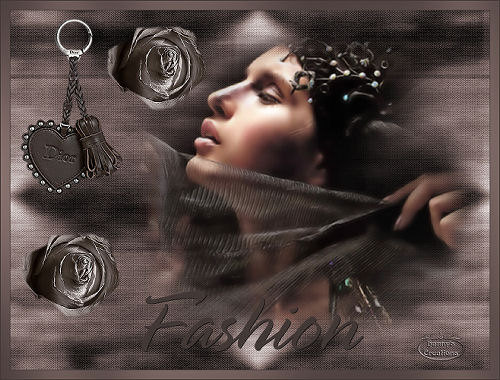
Materials : : 3 tubes and 1 image
Save them into the file of your choice
Open in psp
Take along this arrow to where remember you have remained

1 - Open a new transparent image 800 x 600.
2 - Selections / Select All
3 - Open bg_blendeeyes1.jpg Edit / Copy
Edit / Paste into selection
Selections / Select None
4 - Adjust / Hue and Saturation Hue - 6 Saturation - 26
5 - Effects / Plugins / Filters unlimited 2.0-Paper textures canvas-fine
Intensity - 156 Lightness - 87
6 -Open Marif 2007
Image / resize
Resize the height to 600. The width adjusts itself automatically
7 - Edit / Copy
Edit / Paste as new layer
8 - Move her a little to the right. Look at my example tag.
9 -Open mari 2007_06Juin Edit / Copy
Edit / Paste as new layer
10 - Place in the upper left corner.
11 - Open SFK 06Juin Edit / Copy
Edit / Paste as new layer
Adjust / Hue and Saturation Hue - 6 Saturation - 26
12 - Image / Resize 80% make sure the all layers box is NOT checked. Do this three more times. (totalling 4 times).
13 - Move to the right of the keychain. Look at my example tag.
14 - Layers / Duplicate
Move under the keychain. Look at my example tag.
15 - Image / Add Borders 1 pixel symmetric Color: #3d3330
Image / Add Borders 15 pixel symmetric Color: #-75615e
Image / Add Borders 1 pixel symmetric Color: ##3d3330
16 - Select the 15 pixel border with your magic wand tool.
17 - Effects / Plugins / Gregs Factory output II / poolshadow
All settings on 50 except the last one should be 128
18 - Select the font tool and choose a nice font for any text you’d like to add.
Don’t forget your watermark
Layers / Merge / Merge Visible
19. Save As .jpg
I hope you had fun with this tutorial. Love, Hanny