|
Cina Girl's
Gregs Factory Output Voll. Poolshadow default
|
Cina Girl's
Gregs Factory Output Voll. Poolshadow default
4 Tubes a background and 1 brush
Save them into the file of your choice
Open in psp
Take along this arrow to where remember you have remained

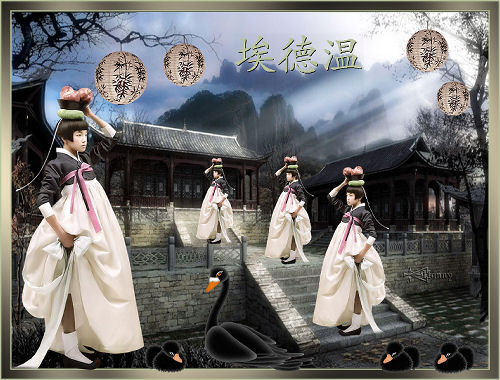
1 - Open a new image Width 800, 600 Height, select all
2 – Open neo-digital-art-030
3 - Edit – copy, paste in to selection
4 – Open Alies 198-vrouwen-2801-2010
5 – Image – resize Height 300, Width will adjust
Mirror
6 – Edit – copy, paste as new layer
7 – Move her to the bottom of the stairs
8 – Select eraser tool and erase a bit of the gown
9 – Duplicate and image resize 80 % all layers not checked
10 – Move her 1 stair higher
11- Duplicate and image resize 80 % all layers not checked
12 Move her 1 stair higher
13 – Open AH_lampion-bambus_1504_08
14- - Image resize Height 125 , Width will adjust
15 - Edit-copy-paste as new layer
16- Move it to the left on top of the branch
17- Layers-duplicate-resize 80 % all layers not checked, move it to the left beside the other one
18 – - Layers-duplicate and move it to the right into the tree
19 - Layers-duplicate-resize 80 % all layers not checked and move it to the right beside the other one
20 - Layers – merge – merge all layers (flatten)
21 – Image - add borders 2 pixels # b9c39c
22 – Image - add borders 15 pixels # 9d987a
23- Image - add borders 2 pixels# b9c39c
24 – Select large border with your magic wand
25 – Effects – plugin effect - Gregs Factory Output Voll. Poolshadow default
26 - Open Open Alies 198-vrouwen-2801-2010
27 – Image – resize Height 500, Width will adjust
28 - Edit – copy, paste as new layer
30 – Move her to the lower left and erase a bit
31 – Open jk-swanblack Image-mirror -resize Height 250 Width will adjust
32 - Edit – copy, paste as new layer
33 - Resize 80 % all layers not checked, and move her in position
34 – Open jk-swanbabyblack
35 - Image - resize Height 70 Width will adjust – image mirror
36 - - Edit – copy, paste as new layer
37 – Move her to the left
38 – Layers – duplicate- mirror, move it to the right , repeat
39 – Layers – merge – merge all layers (flatten)
40 – Open brush xander File-export custom brush, give it a name
41 – Layers – new raster layer
42 – Brush tool , Find the brush you just made
43 – Brush with background color b9c39c, size 218
44 – Give a drop shadow and add watermark
45 - Image- resize Height 600 Width will adjust
46 - Save as jpg compression value 2o
Nice lesson, with a beautiful result
The lesson is done, have fun, love Hanny
Translate from Rita